Data Factory V2 was announced at Ignite 2017 and brought with it a host of new capabilities:
- Lift your SSIS workloads into Data Factory and run using the new Integrated Runtime (IR)
- Ability to schedule Data Factory using wall-clock timers or on-demand via event generation
- Introducing the first proper separation of Control Flow and Data Flow to allow more complex orchestrations such as looping, branching and other conditional flows
- Incremental Loads using the new Lookup Activity
And it’s this last item that today’s article is about.
It’s fair to say that in its initial incarnation, Data Factory didn’t allow for more traditional ETL workloads without some complex coding (more than you were used to if you came from the world of SSIS and similar ETL tools). For the big data focused ELT workloads where data is moved between data services (SQL Server, Blob Storage, HDInsight and so forth) and activities applied whilst the data is in place (SQL queries, Hive, USQL, Spark) Data Factory V1 really excelled, but for those who wanted to move their traditional ETL delta extracts to Data Factory, it wasn’t quite there.
In this new public preview the product team have taken great steps in remedying this, allowing ETL developers to implement proper incremental loading patterns with their relational data warehouses. It’s also worth knowing I’ve seen where Data Factory is going, and it’s looking amazing…
The following example is based on the official tutorial here. The differences in this example are based on the scenario where you wish to perform incremental extracts from a source database to a staging area inside another database. This example uses Azure SQL Database as both the source and sink, but can be adapted for other data sources.
The solution files used in this example can be found here
Prerequisites
This example assumes you have previous experience with Data Factory, and doesn’t spend time explaining core concepts. For an overview of Data Factory concepts, please see here.
So for today, we need the following prerequisites:
- An Azure Subscription
- An Azure SQL Database instance setup using the AdventureWorksLT sample database
That’s it!
Incremental Loading in Data Factory v2
The diagram demonstrates a high level overview of the process, and should be familiar to those who have built similar data flows with other ETL tools such as SSIS:

Process
There are four main steps to this process to create an end to end incremental extract.
- Identify the trigger column. In the Data Factory documentation this is referred to as the Watermark column so I’ll use this latter term for consistency going forwards. This column is one that can be used to filter new or updated records for each run. This column is normally an automatically updating datetime column (e.g. Modified_Date_Time) or an ever increasing integer. We use the maximum value of this column as the watermark.
- Create a data store to hold the watermark value. In this example we store the watermark value in our SQL Database.
- Create a pipeline that does the following:
- Creates two Lookup Activities. The first looks up the last watermark value and the second retrieves the current watermark value.
- Create a Copy activity copies rows from the source where any watermark values are greater than the old watermark value. These delta rows are then written to our target table.
- Create a stored procedure that updates the watermark value, ready for the next run.
Building the Solution
Create a Staging Table
In this example, we’ll use the SalesOrderDetail table in the AdventureWorksLT database:
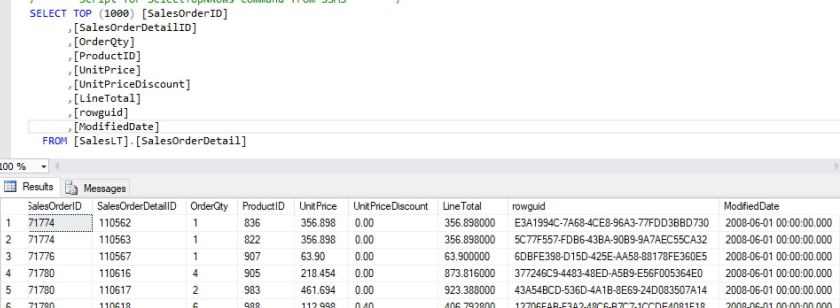
And we will use the ModifiedDate as the watermark column.
We therefore need to create a target or “staging” table to load our delta rows into.
Run the following SQL in your created database to create a staging version of the SalesOrderDetails table:
CREATE TABLE [SalesLT].[SalesOrderDetail_Staging]
(
[SalesOrderID] [int] NOT NULL,
[SalesOrderDetailID] [int] NOT NULL,
[OrderQty] [smallint] NOT NULL,
[ProductID] [int] NOT NULL, [UnitPrice] [money] NOT NULL,
[UnitPriceDiscount] [money] NOT NULL,
[LineTotal] [money] NULL,
[rowguid] [uniqueidentifier] NOT NULL,
[ModifiedDate] [datetime] NOT NULL,
[ExtractDate] [datetime] Default Getdate()
)
Create a table for our watermark values
Run the following command in your SQL Database to create a table named watermark that will store our watermark value:
create table watermark
(
TableName varchar(255),
WatermarkValue datetime,
);
Set the default value of the watermark with the name of our source table. In this example, the table name SalesOrderDetail.
Insert into watermarktable
values (‘SalesLT.SalesOrderDetail’, ‘1-jan-2017’)
Create a stored procedure in our SQL Database:
This stored procedure is used to update the watermark table when new rows have been extracted.
CREATE PROCEDURE sp_write_watermark @LastModifiedtime datetime, @TableName varchar(50)
AS
BEGIN
UPDATE watermarktable
SET [WatermarkValue] = @LastModifiedtime
WHERE [TableName] = @TableName
END
Create Some Trigger Data
Run the following command on your SQL database to update a couple of rows in the source table. This is to validate the process is working correctly as it marks the rows as modified with today’s date, which is greater than the row in our watermark table. If the process is successful it will extract these changed rows.
update [SalesLT].[SalesOrderDetail]
set modifieddate = getdate()
where salesorderid = 71774
Create a Data Factory
Create a new Data Factory. For ease, do it via the portal following this guide.
(Ensure you create it using ADFv2):

Create your Data Factory Artifacts
You will need to create the following (I’ve included my own samples in the link at the beginning of this article):
- AzureSQLLinkedService
- A source SQL dataset (for our source table)
- A target SQL dataset (for our destination table)
- A watermark dataset (that stores our watermark value entries
- A pipeline that coordinates the activities
Modify the files to suit your needs and setup for your database server and database.
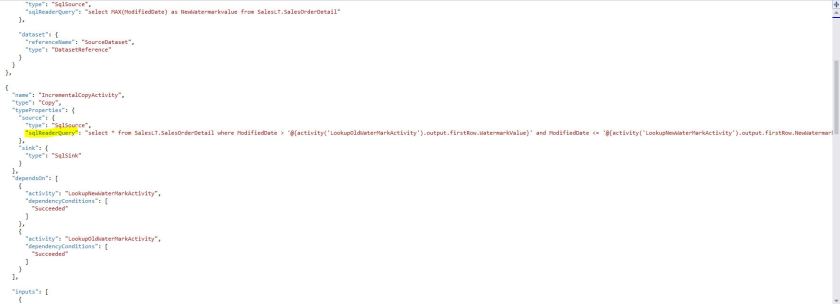
I won’t show the different JSON here, but just to highlight, the key area is the new Lookup Activity shown below:
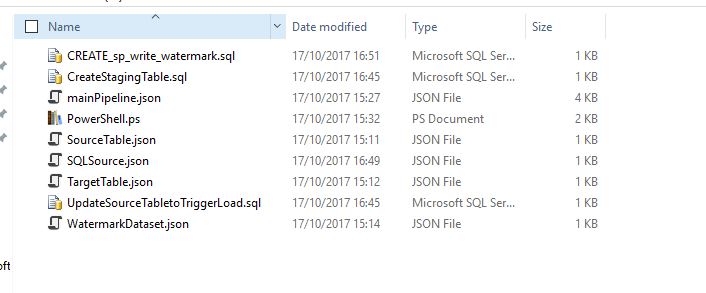
Create a folder on your root C Drive to hold the created JSON files
I created a folder called “adf” and put all my JSON files there:
Deploy Data Factory Artifacts
For the current preview, you cannot deploy using the GUI, so you need to deploy programmatically. For this example I’m using Powershell. Note you will need to update your Powershell install with the latest cmdlets by running the following command:
Install-Module AzureRM
After updating the AzureRM cmdlets, run the following Powershell script below (attached at the start). This will deploy the necessary artifacts to your Data Factory.
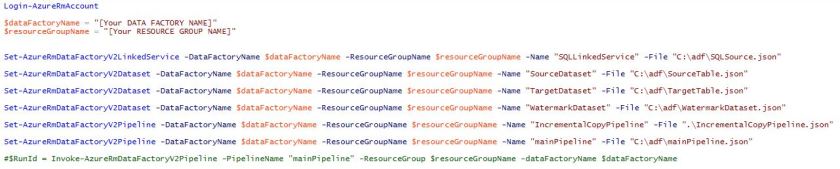
Run the pipeline
Once deployed, you can run the deployed pipeline via Powershell with the following command:
$dataFactoryName = “[Your DATA FACTORY NAME]”
$resourceGroupName = “[Your RESOURCE GROUP NAME]”
$RunId = Invoke-AzureRmDataFactoryV2Pipeline -PipelineName “mainPipeline” -ResourceGroup $resourceGroupName -dataFactoryName $dataFactoryName
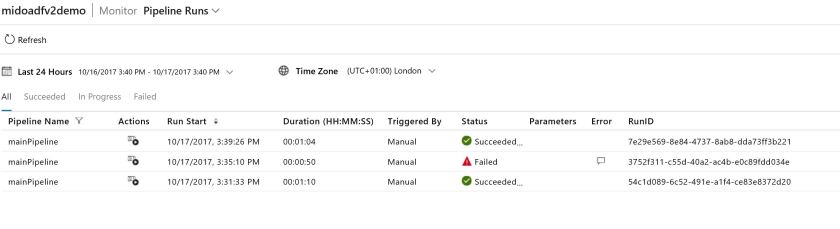
This fires off the pipeline. You can monitor its progress using Monitor & Manage:
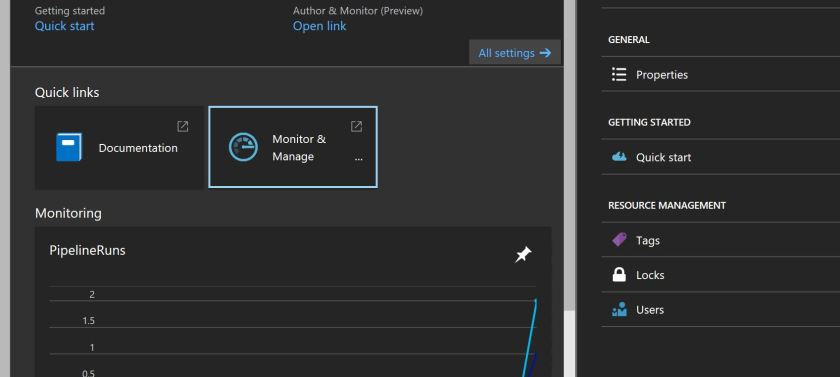
And this allows you to see the status of the running pipelines:
With the pipeline processed successfully, I’ll check my database tables to check everything has updated correctly:
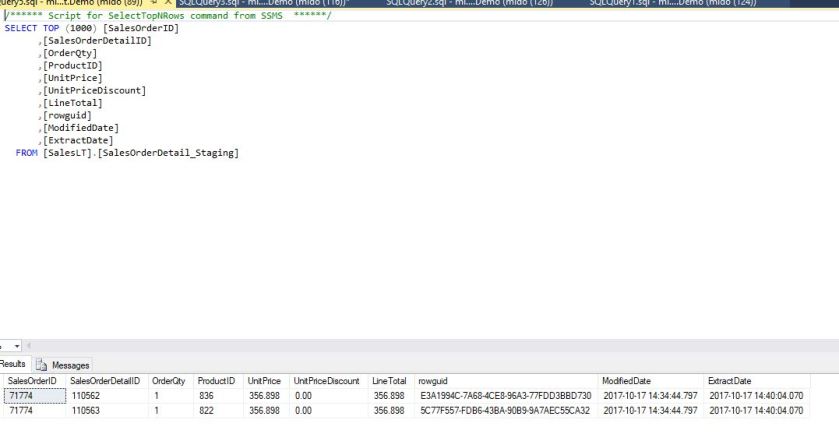
Bingo!
And the watermark table has been updated successfully:

This completes this article covering a simple ETL incremental extraction using the new Data Factory. The roadmap for this product is very exciting, and I encourage you to check out the links below for further reading:
Introduction to Data Factory v2

Hi Mike, thanks for the article and description. I have problems with datetime values. The data gets duplicated in the stage table. I asume that data factory has another date accuracy than SQL Server datetime.
ModifiedDate in SourceTable: 2017-11-20 21:15:50.040
Written to Watermark Table: 2017-11-20 21:15:50.000
Do you have the same issues?
Best regards, Stefan
LikeLike
How can I build this using the source as Onprem SQL Server and Destination Being Azure Datawarehouse????
LikeLike
I have been Using Saras Analytics Daton for ELT to transfer entitlements and liability that are created by a commission case or that arrived in the system.
LikeLike