The rise of remote working has come as no surprise in the last year for obvious reasons. From a Microsoft perspective, this has seen the massive growth in use of Teams and related services to support not only the remote worker, but also the ability to provide services to customers in a more virtual fashion.
One such service is Microsoft Bookings, which allows companies to create virtual consults with customers, patients etc.
Recently, I had a request to help out a public sector customer who was using Bookings extensively and wanted to be able to extra the raw data from the Bookings “back end” so they could perform analytics on it. Said customer was an Azure user so favoured using data tools such as Azure Data Factory.
“Ha, that’s easy!” I cried, with my usual abandon. I knew there were Graph Data Connectors for Data Factory so figured it would be as simple as just setting up a pipeline with the Graph Connector and job done.
Not so.
Whilst the Graph Connector is a great resource, and is ideal for extracting data in tabular datasets from the Microsoft Graph, it has certain restrictions that might hinder certain scenarios, and, crucially, didn’t seem to expose the datasets needed from the Microsoft Graph.
So – this post is about the solution I DID come up with – and what follows is a guide to querying the Microsoft Graph API with Azure Data Factory. It’s specifically for the Bookings API, but it can be adapted for any endpoint from the Graph once you understand the method.
Disclaimer 1 – This is a basic “how to” guide and so not meant to be production ready. Please consult with your admins to ensure all necessary policies are aligned with.
Disclaimer 2 – I know that are many ways of accomplishing this with various tools and programming languages. However, I’m not a developer, and with my Azure data engineer hat on I wanted to find a solution that fellow data engineers in this space could use with their own tools and methods.
0 – Prerequisites
- An Azure subscription with permissions to register applications
- An appropriate sink to load your data to. For ease, I used Data Lake Gen 2.
- Permissions to create a Data Factory on your subscription
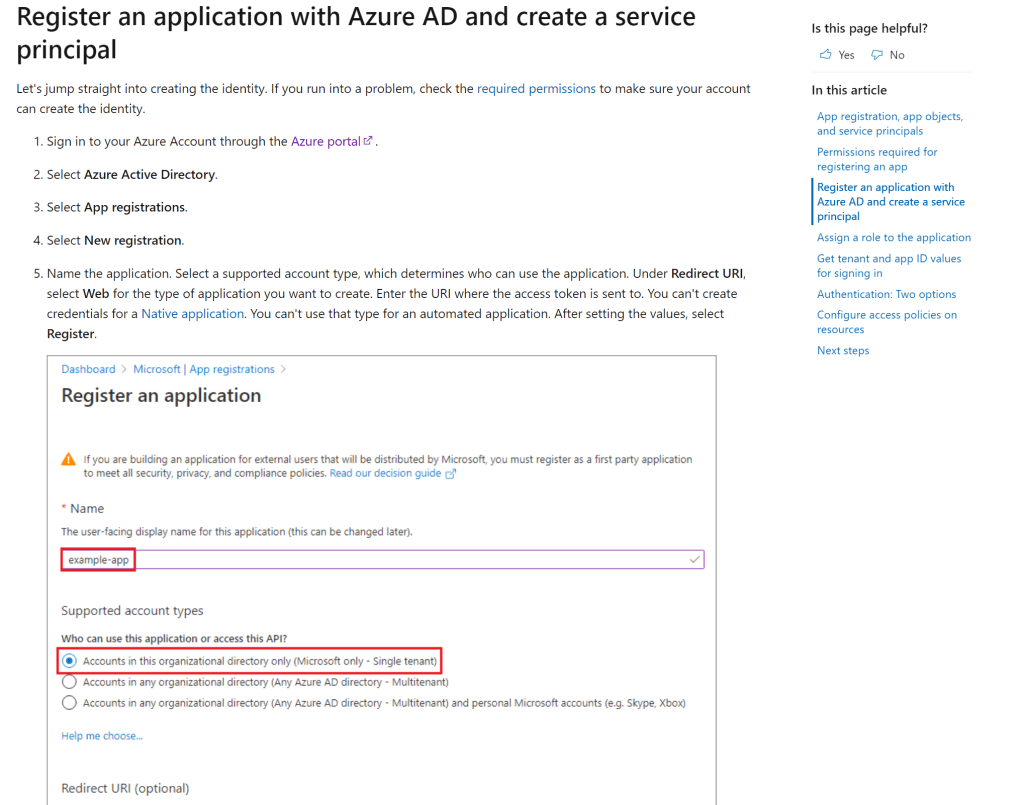
1 – Create a Service Principal.
Another day another service principal – anyone who’s done anything with Azure knows you need to create a Service Principal for tasks that like this. This is essentially an identity that you grant permissions within Azure in order to perform certain actions.
When you’ve created your principal, get your tenant and app ID values and save them for later.
2 – Assign the necessary permissions
Every API in the Graph needs specific permissions in order to query it. For the Bookings API, you need the following permissions in order to query it –
Bookings.Read.All
BookingsAppointment.ReadWrite.All
Bookings.ReadWrite.All
Bookings.Manage.All
See here for the full list of Graph API references
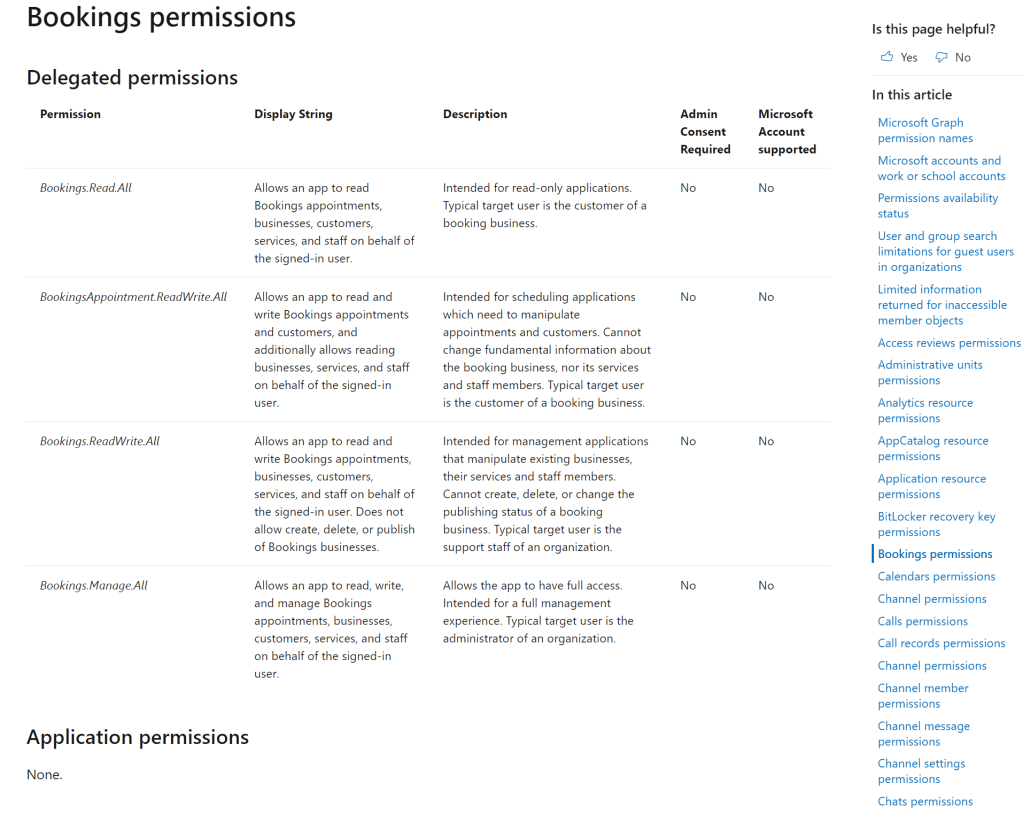
Note, Bookings API are Delegated Permissions, not Application Permissions. This means that you have to provide a delegated user (who consents to granting the permissions the application requests) along with the service principal in order for you to be able to call it successfully. This makes a difference when you’re assigning permissions to call the API as you need to ensure both the calling user AND the service principal have sufficient permissions.
This is what took a while to get working as I had to call a different endpoint to the normal one provided within the Data Factory templates to get the appropriate token to access the API with Data Factory. See here for more information on the difference between Azure AD Application Permission Types.
3 – Assign the necessary permissions
As per this guide, assign the above permissions to your newly creation application.

4 – Build our Data Factory pipeline
We now head across to our Data Factory or Synapse Workspace (if you’re using Synapse Pipelines). I’m assuming you know how to create a Data Factory, but just in case, see here
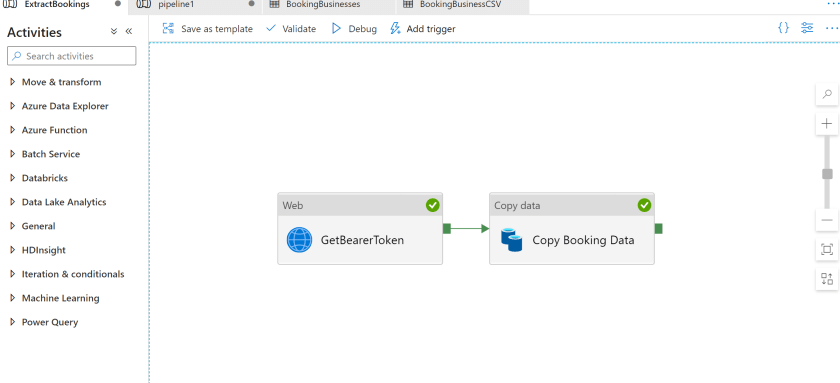
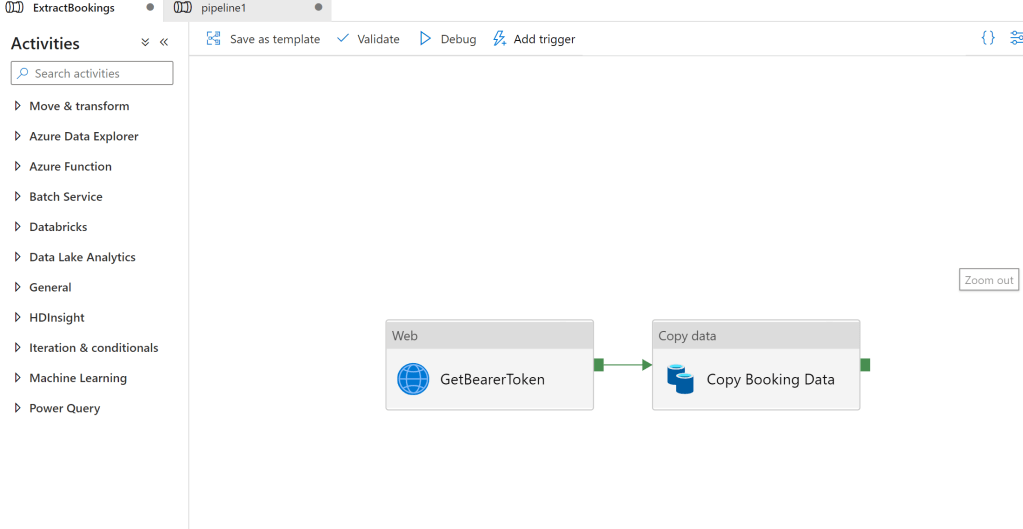
We’re going to create a Copy Activity that uses the following –
- Web Activity – This is used to connect to the authorization endpoint and get a bearer token
- Copy Activity – This will take the Graph API Bookings endpoint as a source, and copy it into our Data Lake as a sink
- That’s it!
Our final pipeline will look this –
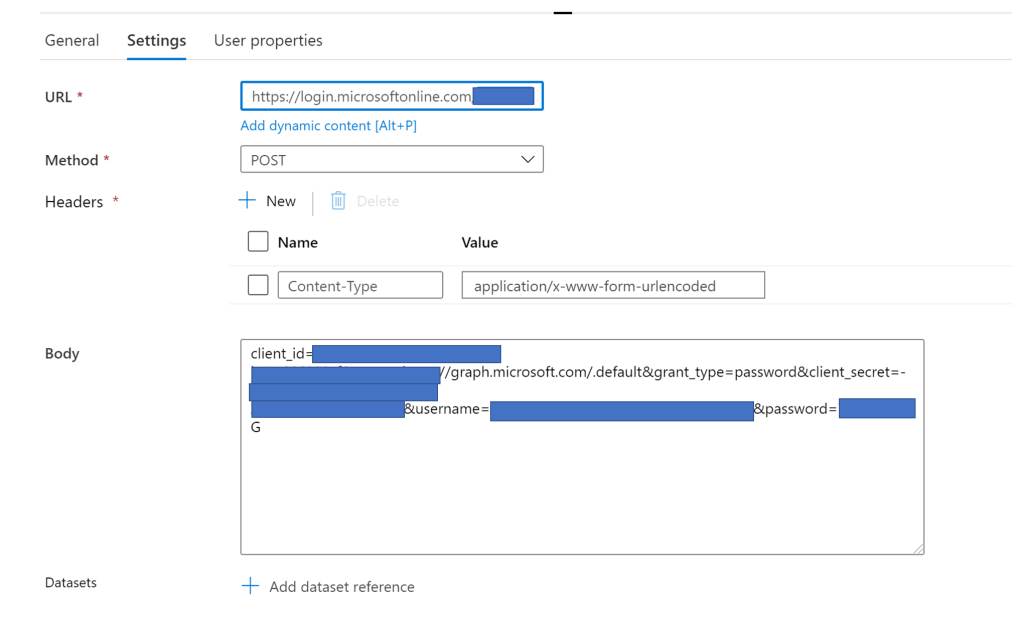
5 – Web Activity (GetBearerToken)
Populate the following (you will need the values you jotted down earlier when you created the Service Principal) –
URL – This is the authorisation endpoint – https://login.microsoftonline.com/<Tenant ID>/oauth2/v2.0/token
Method = POST
Body =
client_id=<Application ID>&scope=https://graph.microsoft.com/.default&grant_type=password&client_secret=-<Application Secret>&username=<Delegated User>&password=<User Password>
6 – Copy Activity
Set your Copy Activity with the following settings –
Source
Note, you need to add an additional header of Name = “Authorization” and a Value of “@concat(‘Bearer ‘,activity(‘GetBearerToken’).output.access_token)”, where the activity is the name of the activity that obtained the bearer token.
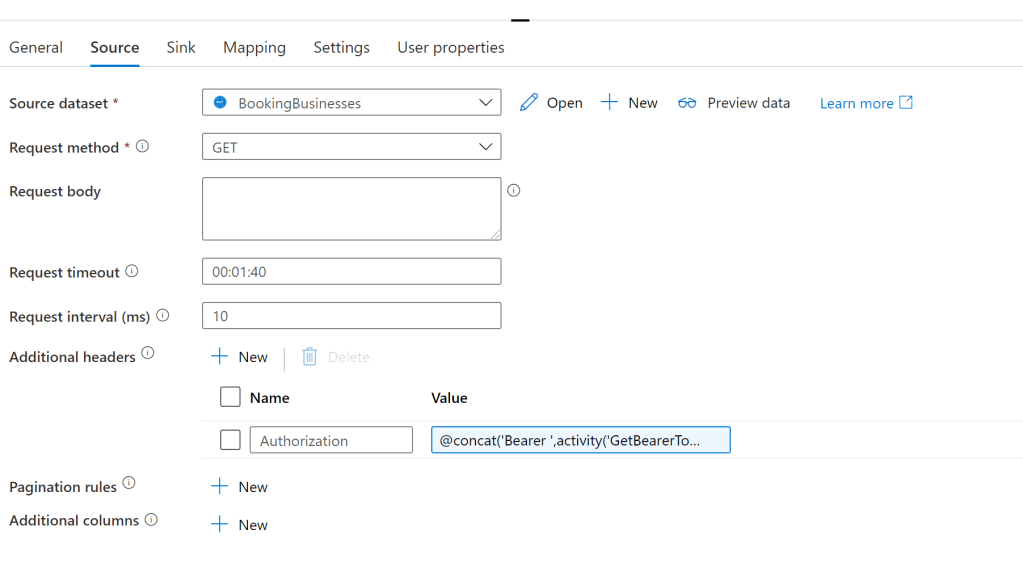
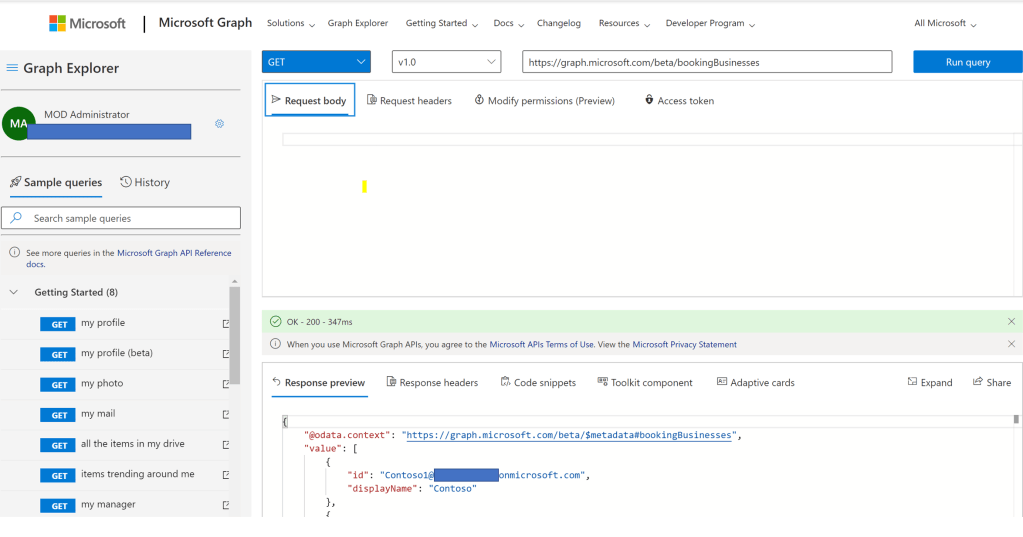
For the dataset itself I created a REST Source that pointed to the BookingsBusinesses endpoint (Base URL) (https://graph.microsoft.com/beta/bookingBusinesses). For a full list of the available Booking API references please see here. This particular endpoint returns a list of Booking businesses I’d created on my tenant.

Sink
Nothing fancy here. In this example I created a csv Dataset on an Azure Data Lake Gen 2 Storage account.

Mapping
The final step is create a mapping to map the incoming JSON schema into a dataset.
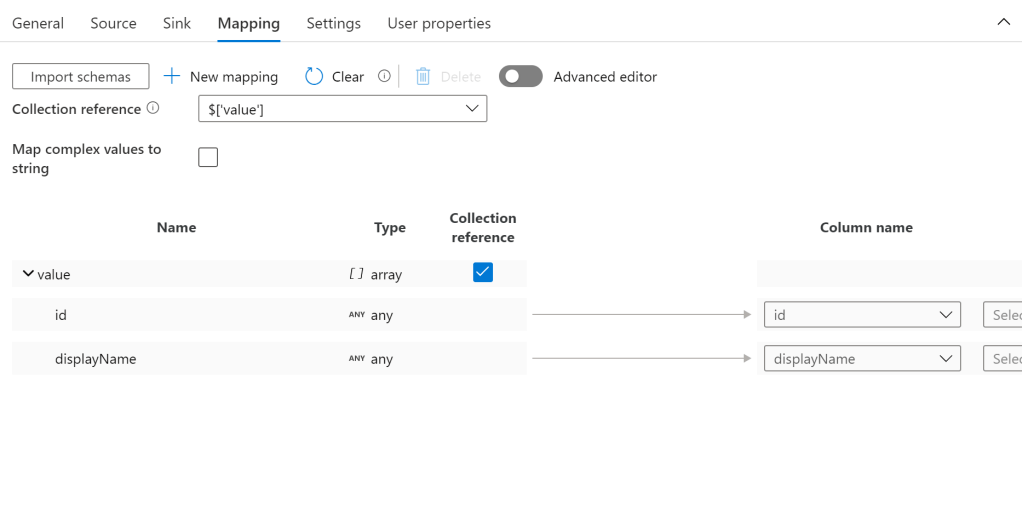
When I first started creating this demo I thought I’d have to something within Mapping Data Flows to transform the JSON but fortunately the Mapping editor in native Data Factory has enough functionality to map the JSON source. For this particular endpoint I set a collection reference for the ‘Value’ array and checked the Collection reference due to the structure of the JSON payload.
We now run the pipeline successfully –

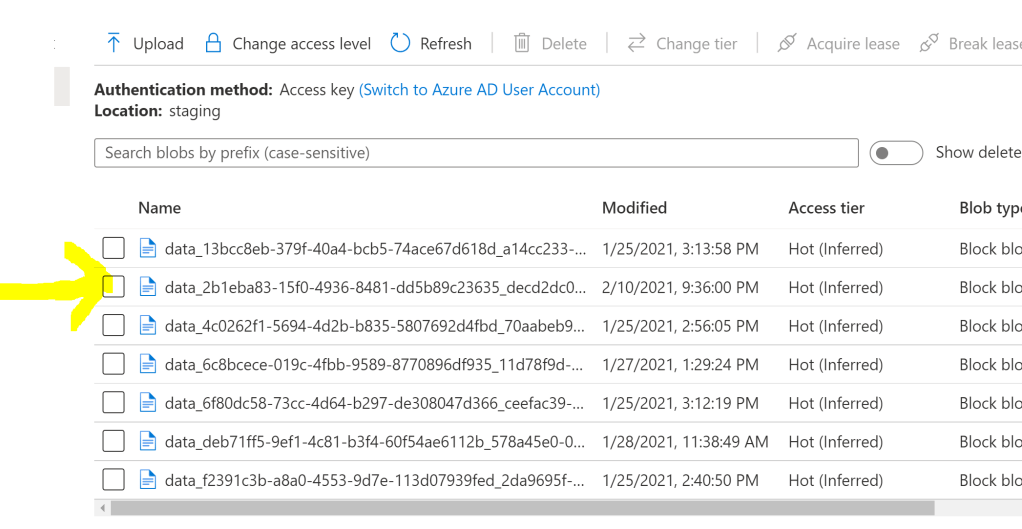
And we see our final file in our data lake –
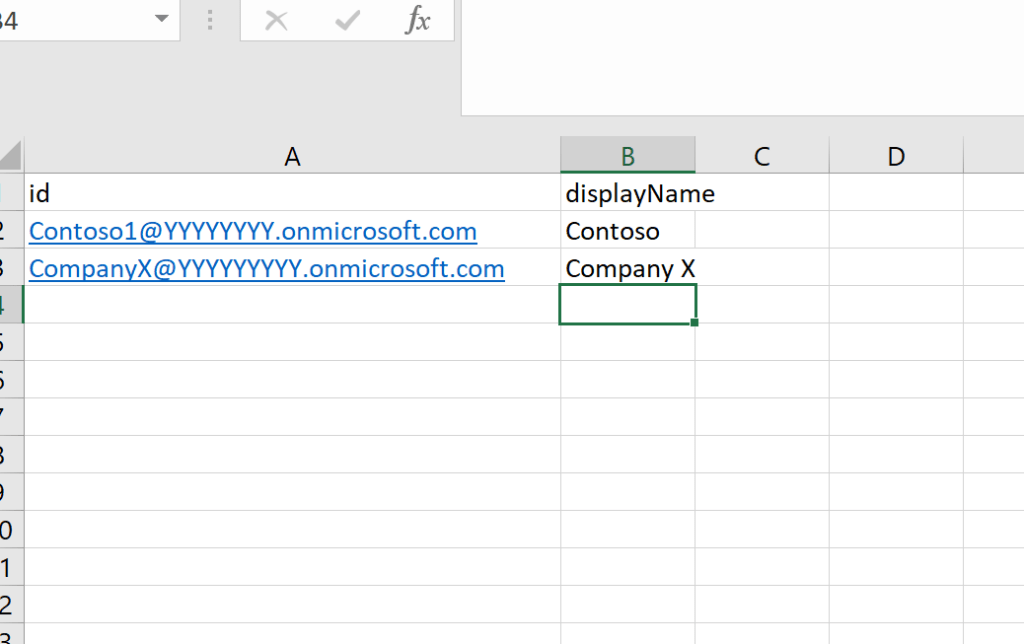
And we see the output obtained from the endpoint –
Summary
Hopefully here you’ve seen how relatively straight forward it is to use Azure Data Factory to call the Microsoft Graph and export relevant data for your needs. The same thing can be obtained using a variety of other methods, such as Logic Apps and Power Automate, but for those of you building data pipelines with Data Factory, hopefully you’ll find this of use.
Final Note
If you want to experiment with the various outputs of the Microsoft Graph API, I advise you to have a play with the Graph Explorer which is a free tool that allows you to call various endpoints and see the results. It also tells you what permissions are required for a certain call, if you couldn’t find out yourself.