In my last blog post (From Warehouse To Lakehouse – ELT/ETL Design Patterns With Azure Data Services) I talked about the different patterns that exist for Extract, Transform and Load (and it’s sibling, Extract, Load and Transform). This has been one of my most viewed posts and I’m glad it’s being received positively.
Following on from that, I want to talk about a tool I’ve discovered recently that supercharges the Transformation part of these patterns and makes it super easy to apply transforms on your data as part of a data pipeline.
That tool is called the Database Build Tool (dbt) and is delivered by the excellent folks at Fishtown Analytics. Useful links follow at the end of this post, but at a high level dbt delivers the following high level benefits (adapted from Transform data with dbt (getdbt.com) –
Transform and Model – With dbt, you write data transformation code in a modular fashion. In dbt, this means that its much easier to update and troubleshoot, but, as it abstracts away the need to write any DDL statements, it’s much, much faster than traditional SQL coding.
Automate Data Quality Testing – dbt includes a robust testing framework so you can apply both assertive and data tests against your data as part of the build. This ranges from core controls such as as ensuring uniqueness and nullability through to custom data tests to ensure your data adheres to business rules as it goes through the “T” process.

Deploy – Software engineering has developed best practices that allow engineers to collaborate on code and integrate changes continuously. Historically, the SQL development world has been slightly behind such practices. With dbt, you can apply these same practices to analytics code: environments, package management, and continuous integration.
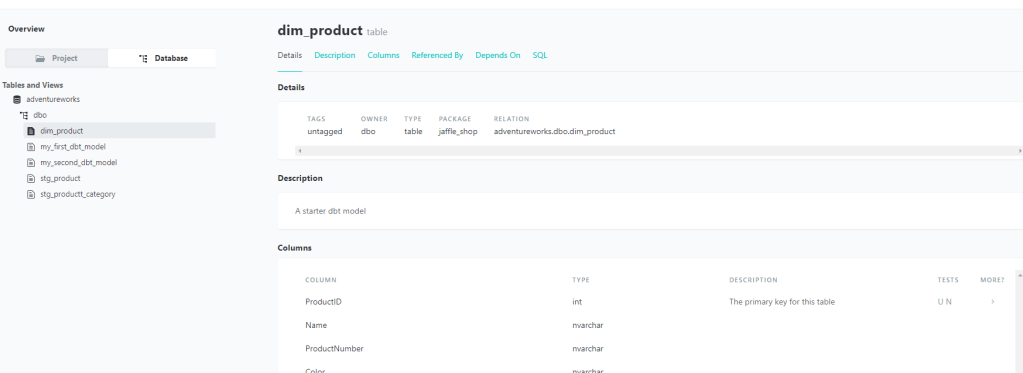
Document – dbt brings with it an excellent documentation feature, giving analysts and business stakeholders visibility into what the data is describing, how it was produced, and how it maps to business logic.
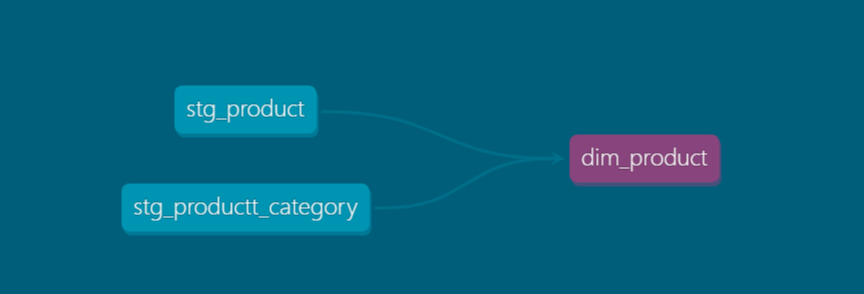
The document feature itself is particularly rich, and allows the viewing of lineage also that form part your pipelines –
And finally, before I go into a simple walk through, just a final feature benefit in that dbt allows you to apply both full and incremental Transforms to your data, which is a common challenge (and often a complex one) with data processing pipelines.
Walkthrough
Now I’ve given an overview, I’m going to walk you through setting up a simple project in dbt. Now, whilst there’s a paid for/cloud version (dbt Cloud), for this demo I’m going to be showing how to do this through the cli, which is a totally free too to build your models.
This article will focus on setting up models in dbt to materialise your database objects. Future articles in the series will focus on testing, documentation and CICD respectively.
Prerequisites
The “hello world” example on the dbt site uses Google BigQuery as the platform to work with. As a Microsoft guy I’m adapting this to use Azure SQL Database with the sample AdventureWorksLT database installed. In terms of components, you will need the following –
- Azure SQL Database with Adventureworks schema installed – see here for instructions
- An IDE to work on your dbt project. I use Visual Studio Code which is free, extensible and works a treat. See here for download/install instructions.
- A Python install on your dev machine. I use Anaconda and create a new environment in it to keep my code clean and separate from our projects. See the visual studio docs for configuring your own environment.
Once the above is setup you’re good to go!
Install
The first step install the dbt cli itself. Guidelines are here, and I used the pip installer (this is a Python package). Note, it’s recommended to create your own python environment to keep better control of packages.
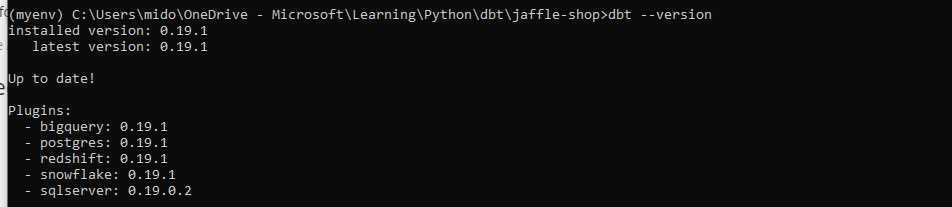
pip install dbtOnce installed you can check all is fine and dandy by running the following –
dbt --versionThis will return the following, indicating a successful install –
In the out-of-the-box install the sqlserver profile (essentially supported connections and which I use for this demo) isn’t installed, so I have to pip install it separately –
pip install dbt-sqlserverOther supported profiles, including for Databricks, Azure Synapse and others, can be found here.
Create Project
With my environment setup, I can now create a project. Creating a project is as simple as
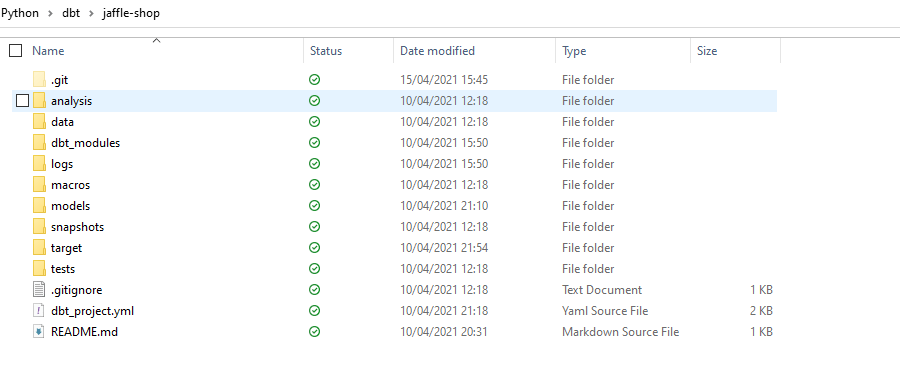
dbt init <Project Name>This creates a scaffold for your project with the necessary folder structure ready to begin developing –
With our project scaffold in place, we can now go on to creating our models. In dbt, a model is essentially a .sql file that contains transformation code. In this example, I’m going to take two “staging” tables from the AdventureWorks source database, apply some light transforms and then transform them into a “dim_product” table in the target database. All of this without having to write or manage any DDL code!
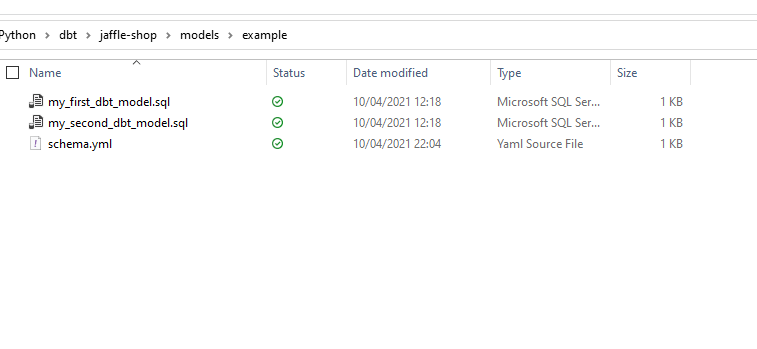
If I go into the the models folder from the created project, I will see there’s already a sample file (my_first_dbt_model.sql) created for me –
Which contains some scaffold SQL code that will create an entity in my target when the project builds –
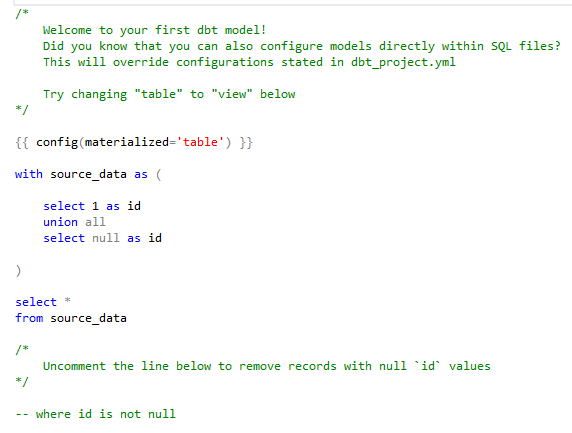
A quick run of my project will run the above model code and materialise the output as a table in my target SQL database. Note, the config setting for “table”. This can also be “View”, “Incremental”, “Ephemeral” and “Snapshot” depending on what you’re building –
dbt runThe output shows it’s run successfully –
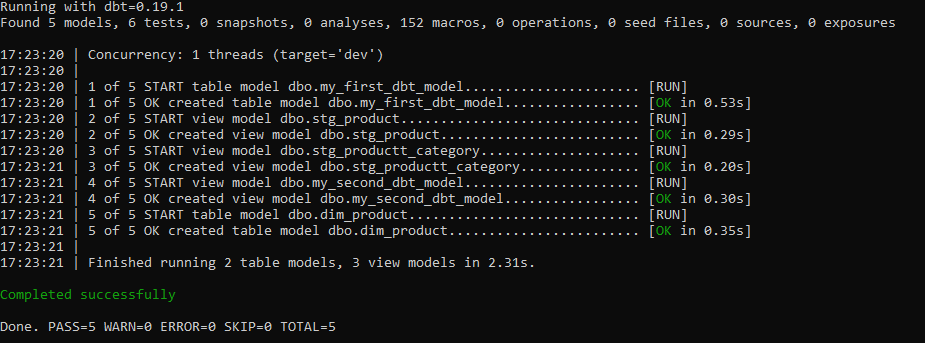
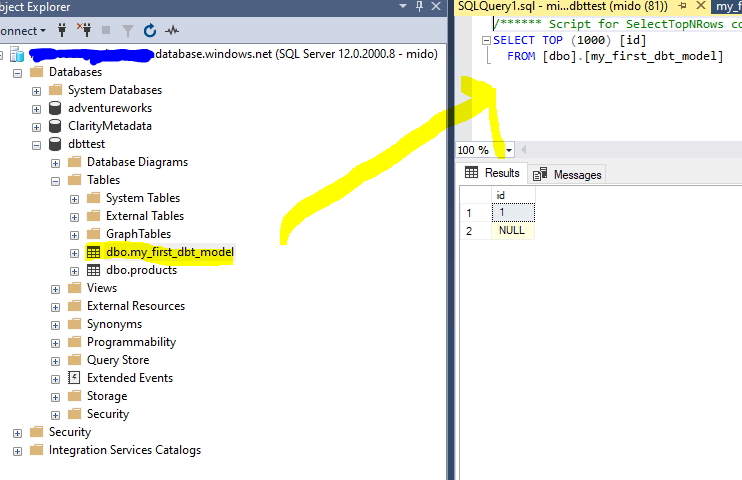
And a quick check in my target database shows the table has been created. Note, the table/view name is based on the name of the model file, which in this case was “my_first_dbt_model” –
So, now I’ve got my project up and running, I want to go build a “proper” transform process into it. For this, I’m going to take the “SalesLT.Product” and “SalesLT.ProductCategory” table from our source database and transform it into the “Dim_Product” dimension table.
To do this, we’ll create three SQL models – one for each of the staging tables and one for the final Dim_Product table –
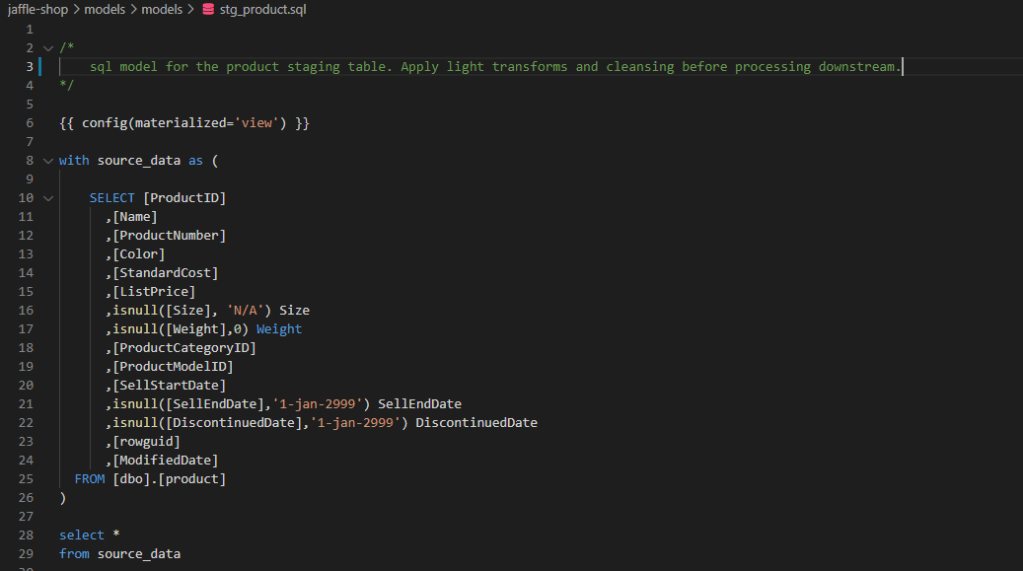
stg_product:
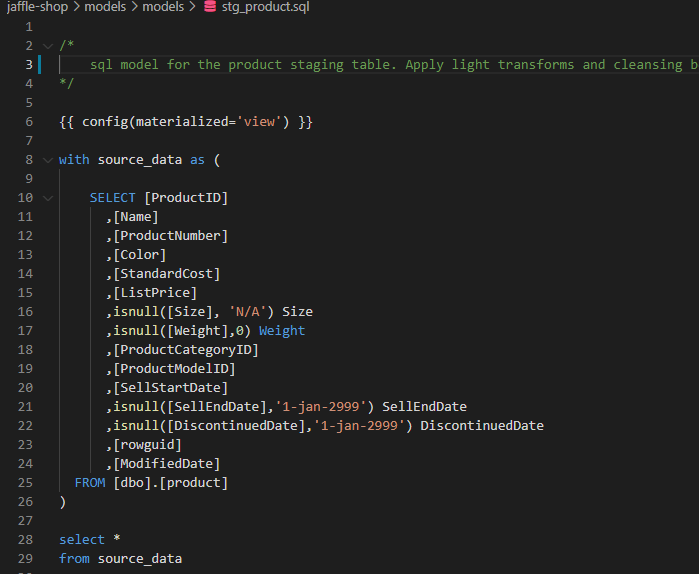
When I run the project again, you will see the the transformations views have been materialised in the target database –
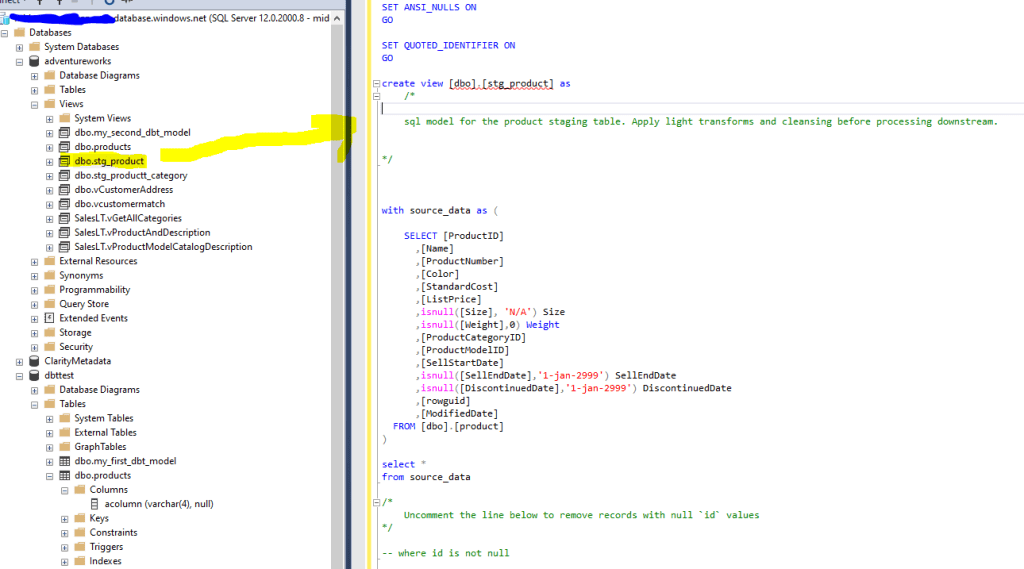
We do the same for the other staging tables which creates the necessary views. From this point, we need to create the dimension itself, Dim_Products. This will materialise as a table this time, and is formed from the previous two models we’ve already created.
Note, we simply reference the models we’ve already created for stg_product and stg_product_category. No DDL in sight! This is provided by the excellent Jinja templates which essentially turns your IDE into a programming environment for SQL and extends it with Python templates. The “ref” function shown below is an example of that feautre, but do check out the link above for further examples.
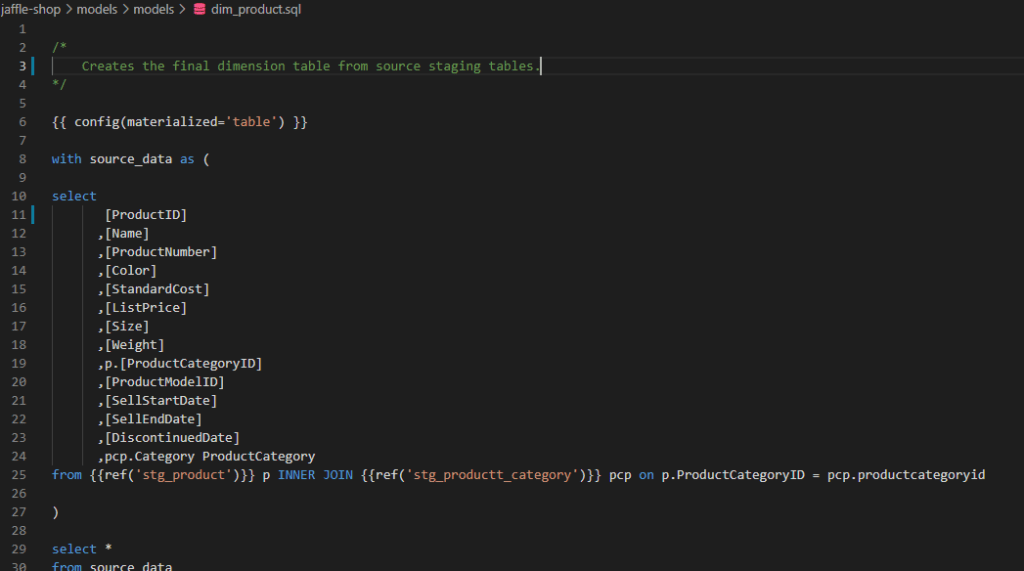
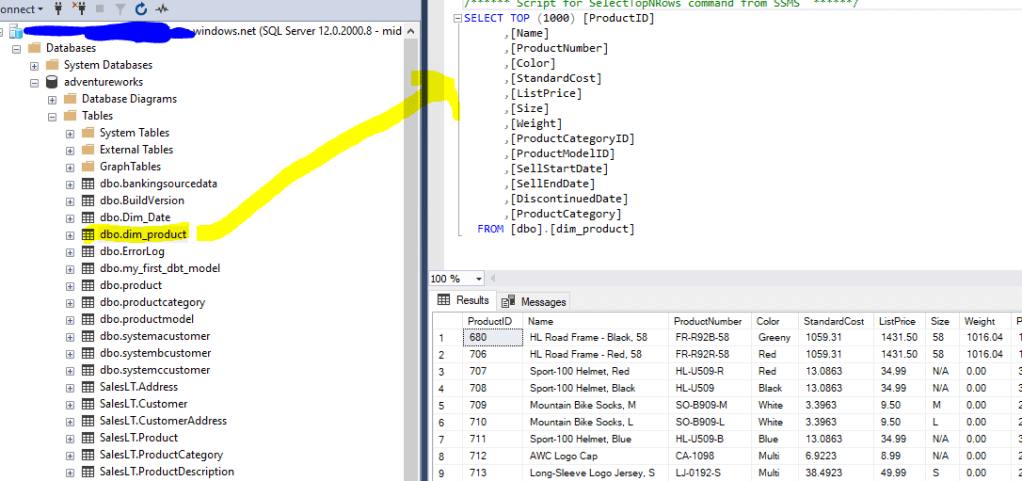
When we run our build we see the newly created dimension table!
Voila!
Hopefully you can see the potential for jumpstarting your Transformation processing as part of an ELT pipeline. I’ve only just scratched the surface of what dbt can do, and in future articles in this series I’ll dive into other features that the platform delivers such as testing, documentation, dataops and more.
For those that can’t wait, and want to learn more around dbt, please check out the links below –
dbt (data build tool) – Transform data in your warehouse (getdbt.com)
What is dbt? | docs.getdbt.com
What, exactly, is dbt? (getdbt.com) (old, but an excellent primer on dbt)
